

How To Upload Textures To Steam Workshop

Paint the Town Red
This item has been removed from the community because information technology violates Steam Community & Content Guidelines. It is only visible to you. If you believe your detail has been removed past fault, please contact Steam Back up.
This detail is incompatible with Pigment the Town Ruby-red. Please meet the instructions page for reasons why this item might not work inside Paint the Boondocks Red.
Electric current visibility: Subconscious
This item will simply be visible to yous, admins, and anyone marked as a creator.
Electric current visibility: Friends-only
This item will just be visible in searches to you, your friends, and admins.

Non enough ratings

How to Create and Upload Custom Textures
Welcome. This guide will teach you exactly how to create textures to employ in the game and so upload the texture packs to the workshop. And so let'south go started.
Where Textures are Located
Get-go thing you lot volition demand to know is where the textures you make for the game are stored. This applies to your textures, not workshop textures. You have to go to (your storage drive for the game)>Users>(your name)>AppData>LocalLow>South E Games>Paint The Town Red>CustomTextures. This is where all textures are stored. (The black boxes are censoring textures I have made that haven't been released.)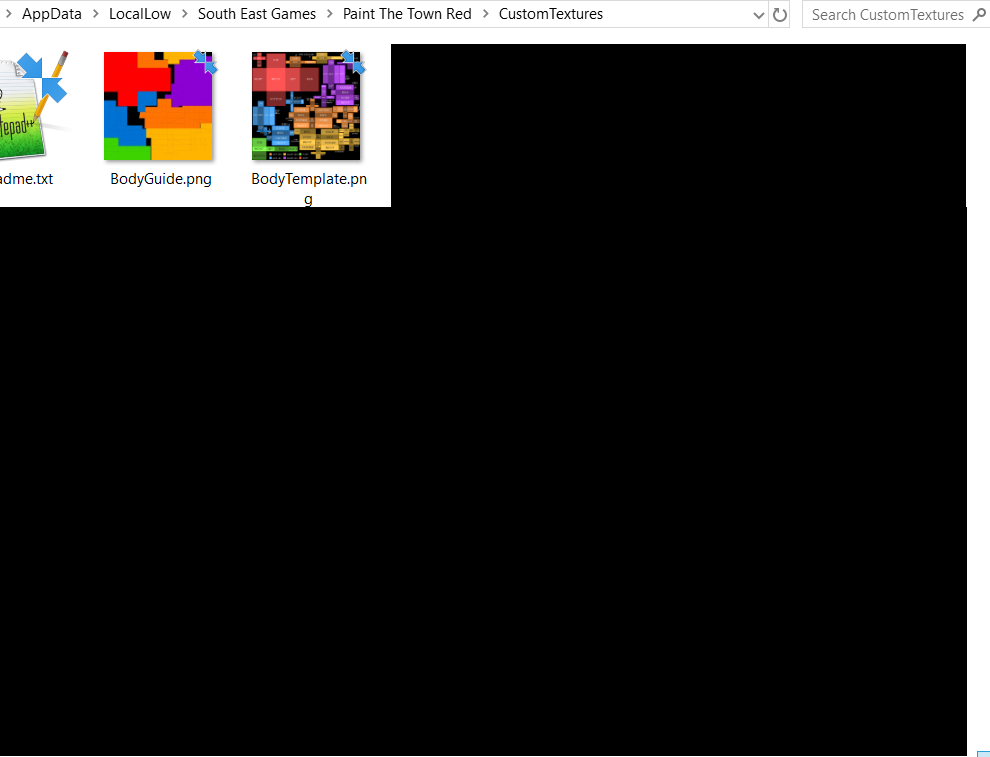
Creating the Textures
Adjacent affair we do is create the textures themselves. For a character body texture, you simply demand 1 texture called "(your character name)_Body". For a head texture, yous need half dozen. Here is a list of them:
- "(your graphic symbol name)_Normal" (face up texture)
- "(your character name)_Blink" (confront texture)
- "(your character name)_Wince" (face texture)
- "(your character proper name)_Angry" (face texture)
- "(your character name)_Dead" (face texture)
- "(your character proper name)_Head"
The first 5 are character expressions, and the concluding name is the whole caput. Lets start past going into an fine art tool of your choice. In that location are many tools to attain this, similar GIMP and Photoshop, just I will be using MS Paint 3D. I will now create the first texture, "(your grapheme name)_Normal". These don't have to be created in any society, just information technology is vital to have all of the textures for the head, or it can't load in the game.
One thing important to note is that the textures also take to have the right size. The game accepts head textures of 1024x1024 or 2048x2048. For confront textures, they can exist simply 1024x1024.
Proceed on making your face up textures with the right sizes and formats and put them in the texture folder. As an boosted option, there are example head and face textures already in the folder that yous can edit and salve every bit unlike pictures of your own, if you don't desire to resize a moving-picture show yourself. When you are done with the face textures, information technology is time to work on the head texture. The head texture is slightly different as it encompasses the whole head. At that place are specific areas that it uses every bit the sides of the head. A (rough) outline is shown to the left. 


Uploading the Textures
It is important to upload the textures to the steam workshop in order to actually use your textures in custom maps. This step is simple. Name your pack in the bar next to the "upload" push button in the texture pack creator, and make sure it is an original name that some other pack does not use. Press "upload" and and so press "upload pack". Afterward a brief delay, the pack volition upload. Now go into your steam workshop items and make a clarification and anything else you demand. Now, turn the visibility settings to "friends merely" or "public" to utilise the textures in the level editor. Congratulations, yous have made your own pack to use in the game.
Conclusion
Thanks for checking out this guide. Exist certain to go out any feedback and problems yous have in the comments below, and I volition respond as soon as possible if aid is needed.
![]()
![]()
You need to sign in or create an account to do that.

Source: https://steamcommunity.com/sharedfiles/filedetails/?id=1619662892
Posted by: raythertualong.blogspot.com
0 Response to "How To Upload Textures To Steam Workshop"
Post a Comment